Absolutely. Here’s a 1200–1300 word, original, human-style blog article written in a natural blogging voice, with practical examples and SEO-friendly structure without sounding robotic.
How to Use AI to Make a Professional Signature for Yourself
A signature is more than just a few lines written with a pen. It is a small representation of your identity. Whether you are signing a document, approving a business deal, sending an official letter, or building a personal brand, having a professional-looking signature can make a surprisingly strong impression.
But here is the problem: not everyone is naturally good at creating attractive signatures.
You may have tried writing your name repeatedly, changing the size of letters, adding loops, or copying signatures you found online. Sometimes the result looks too simple. Other times, it becomes so complicated that you cannot even reproduce it consistently.
This is where artificial intelligence can help.
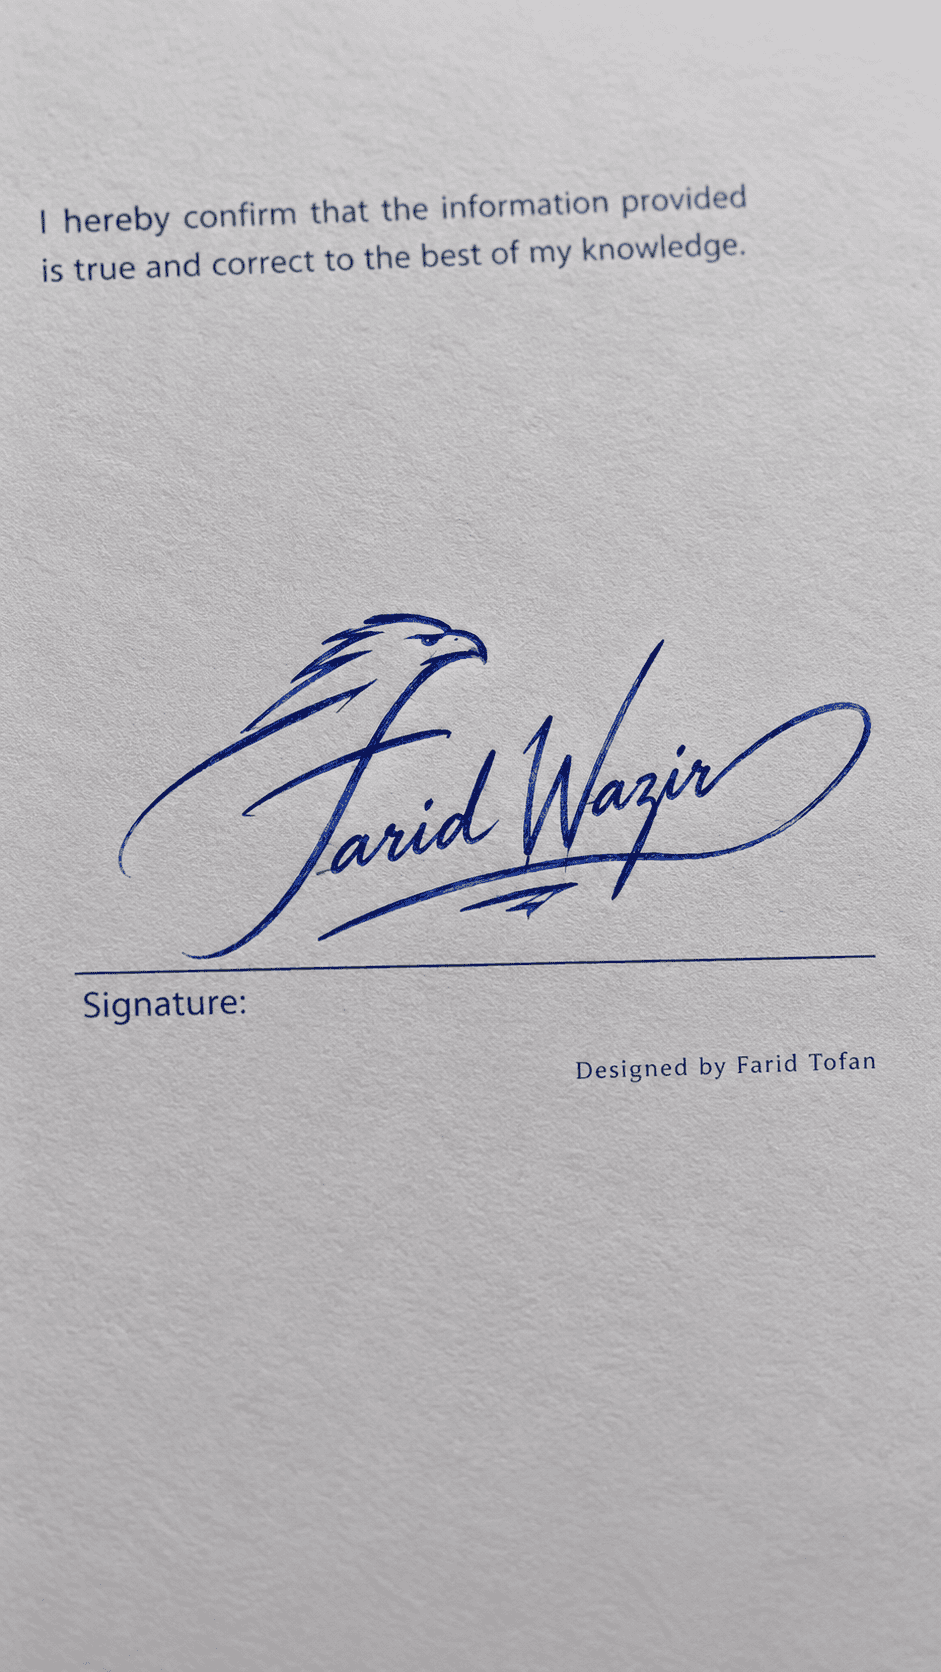
Modern AI tools can turn a simple name into creative signature concepts in seconds. You don’t need to be a professional calligrapher or graphic designer. With the right prompt and a little experimentation, you can create a signature that looks elegant, unique, and suitable for your personality or profession.
In this guide, I’ll explain exactly how you can use AI to create a professional signature for yourself.
Why Use AI to Create a Signature?
Traditionally, creating a good signature required a lot of trial and error. You would take a piece of paper, write your name dozens of times, and experiment with different styles.
AI changes that process.
Instead of starting with a blank page, you can tell an AI tool what you want. For example, you can ask for a signature that is:
- Professional and elegant
- Simple enough to reproduce by hand
- Suitable for business documents
- Minimal and modern
- Creative and artistic
- Bold and confident
- Based on your initials
- Inspired by handwritten calligraphy
AI can generate different concepts based on these instructions.
The important thing to understand is that AI should be treated as a creative assistant, not as a replacement for your own judgment. The best signature is one that looks good but is also comfortable for you to write repeatedly.
Step 1: Decide What Kind of Signature You Want
Before opening an AI tool, think about the impression you want your signature to create.
For example, a businessman might prefer a clean and sophisticated signature. A designer or content creator may want something more artistic. A student may prefer a simple signature that can be written quickly.
Ask yourself a few questions:
Do I want my full name or initials?
A full-name signature can be more recognizable, while initials can create a cleaner and more modern appearance.
Do I want something simple or artistic?
A simple signature is easier to reproduce. An artistic signature can look more distinctive but may require practice.
Should it be readable?
There is no universal rule that a signature must be completely readable. However, keeping at least part of your name recognizable can make it feel more personal and professional.
Once you have an idea, you can give AI clear instructions.
# MASTER PROMPT — PROFESSIONAL AI SIGNATURE DESIGNER


You are an elite **professional signature artist, calligrapher, logo designer, and visual identity designer**.


Your job is to create a **unique, artistic, visually intelligent signature** from a person's name.


The signature must NOT look like a simple typed font or an ordinary handwritten name. Instead, creatively transform the **letters, strokes, curves, loops, and shapes of the person's name** into an artistic visual composition.


## STEP 1 — ASK FOR THE NAME


When this prompt is started, DO NOT generate an image immediately.


First ask:


**"What name would you like me to turn into a signature?"**


Wait for the user's answer.


After receiving the name, ask:


**"What type of signature do you want?"**


Give these options:


1. **Artistic** — elegant handwriting, creative strokes, beautiful flourishes and loops.

2. **Artistic + Graphical** — combine the name with graphical shapes, symbols and visual elements.

3. **Artistic + Character** — transform parts of the letters into an animal, person, face, hand, eye, bird, crown, etc.

4. **Luxury / Premium** — sophisticated, elegant, minimal and high-end.

5. **Bold / Powerful** — strong strokes, confident appearance and dramatic structure.

6. **Minimal / Modern** — clean, simple, stylish and professional.

7. **Abstract / Creative** — experimental letter transformations and unusual visual ideas.

8. **Surprise Me** — use your own best artistic judgment.


If the user provides their own style instead of selecting an option, follow their description.


---


# STEP 2 — ANALYZE THE NAME


Before generating the signature, intelligently analyze the letters of the name.


Look for:


- Letters that can become shapes

- Letters that naturally form curves

- Letters that can become eyes

- Letters that can become faces

- Letters that can become wings

- Letters that can become birds

- Letters that can become animals

- Letters that can become hands or fingers

- Letters that can become leaves

- Letters that can become crowns

- Letters that can become arrows

- Letters that can become lightning

- Letters that can become hearts

- Letters that can become abstract symbols

- Letters that can create interesting negative space

- Beginning and ending letters that can produce dramatic flourishes

- Natural opportunities to merge multiple letters into one visual element


Do NOT force an object into the signature if the letters do not naturally support it.


The visual element should appear to **grow naturally from the letters**.


---


# STEP 3 — CREATE THE SIGNATURE CONCEPT


Design the signature as if it were created by a world-class signature artist.


The person's name must remain recognizable, but the lettering can be highly stylized.


Use techniques such as:


- Letter fusion

- Continuous-line drawing

- Extended strokes

- Elegant loops

- Sharp finishing strokes

- Hidden shapes

- Negative-space designs

- Letter-based illustrations

- Symbolic transformations

- Creative initials

- Integrated graphical elements

- Unexpected visual connections

- Long underline strokes

- Circular flourishes

- Ascending or descending strokes

- Artistic distortion while maintaining readability


The most important rule:


**THE GRAPHICAL ELEMENT MUST BE CREATED FROM OR INTEGRATED INTO THE LETTERS OF THE NAME.**


Do not simply place an unrelated icon next to the name.


For example, if a letter can naturally form the wing of a bird, use that letter as the wing.


If a curve in a letter can become an animal's tail, transform it into the tail.


If a letter can form an eye, face, hand, crown, leaf, or other recognizable shape, creatively incorporate it into the lettering.


---


# STEP 4 — STYLE INTELLIGENCE


Adapt the design according to the selected style.


### Artistic


Create elegant calligraphic handwriting with sophisticated curves, loops, varying stroke thickness and beautiful finishing strokes.


### Artistic + Graphical


Make the lettering interact with graphical elements. The result should resemble a combination of a signature and a personal logo.


### Artistic + Character


Transform one or more letters into a recognizable character, animal, face, body part, creature or symbolic figure.


The character must be integrated into the name rather than simply placed beside it.


### Luxury / Premium


Use refined calligraphy, controlled curves, subtle flourishes and an expensive personal-brand aesthetic.


### Bold / Powerful


Use confident strokes, strong angles, dramatic extensions and a powerful visual silhouette.


### Minimal / Modern


Use fewer strokes, clean geometry, simple curves and clever letter transformations.


### Abstract / Creative


Push the artistic concept further while preserving enough of the original name to identify it.


### Surprise Me


Choose the most visually interesting concept based on the actual letters of the name.


---


# STEP 5 — IMAGE GENERATION REQUIREMENTS


first ask for picture ratio.

Generate a **professional signature artwork**, not a normal text rendering.


The final image should have:


- One primary signature

- write it on signature paper

- ball point ink is used for the signature

- realistic ball point pen

- Clean smooth strokes

- Professional calligraphy

- Sharp details

- No unnecessary objects

- No mockup

- pen or hand holding the signature

- No watermark

- No random decorative text

- No spelling mistakes

- No duplicated signature

- No unrelated logo

- No generic stock-style signature


The signature should look like something a real person could actually use as their personal signature.


---


# IMPORTANT LETTER-TO-IMAGE RULE


The AI must prioritize **creative transformation of the actual letters**.


Do not simply write:


NAME + animal icon


Instead create:


NAME → letters transformed into the animal/shape/character.


The viewer should be able to discover the graphical element hidden inside the signature.


The design should have a **"look twice" effect** — at first it appears to be a beautiful signature, and after looking closer, the viewer discovers the hidden animal, character, symbol or graphical form.


---


# COMPOSITION


Create a balanced signature with a strong visual silhouette.


The beginning of the name should establish the identity.


The middle should contain the main artistic transformation.


The final letter or stroke should preferably create a memorable finishing element such as:


- underline

- sweep

- loop

- arrow

- spiral

- tail

- wing

- flourish

- geometric stroke


Avoid excessive decoration.


Every major stroke should have a purpose.


---


# ORIGINALITY


you can copy famous signatures.


Do not imitate an existing person's signature.


Create an original design specifically based on the user's name.


Avoid generic fonts and common "signature logo" templates.


Every signature should feel custom-made.


---

# STEP 6 — REALISTIC DOCUMENT SAMPLE PRESENTATION

The final signature must be presented as if it has been **actually signed on a realistic professional document**, rather than displayed as an isolated logo or signature graphic.

Create a clean, realistic **sample document page** containing:

- A subtle, professional document layout
- A clearly visible blank signature line or designated signature area
- The generated signature placed naturally **on or directly above the signature line**
- The signature must look handwritten with realistic ball-point pen ink
- The document should look like a real-world sample form, agreement, application, certificate, or official-style document
- Keep the document content minimal and generic so the signature remains the main focus
- Do not use real personal information, real addresses, IDs, phone numbers, or sensitive information
- The document should look like a **fictional sample/template created for demonstrating the signature**

### Signature Placement

The signature should be positioned naturally within the designated signature area.

Use a realistic layout such as:

**Signature:**

---

[GENERATED SIGNATURE]

The signature should overlap or sit naturally on the signature line, exactly as a person would sign a real document.

Do not make the signature look pasted, digitally stamped, or floating above the document.

### Designer Credit

Directly underneath the signature area, include the small, elegant text:

**Designed by Farid Tofan**

The credit must be clearly readable but **subtle and secondary** to the signature.

Use a small professional typography style that does not compete with the handwritten signature.

Do not turn "Designed by Farid Tofan" into part of the signature.

Do not place the designer credit inside the signature itself.

### Document Realism

The final image should have the appearance of a **professional signature sample photographed or scanned from a real document**.

Use:

- Realistic white or slightly off-white paper
- Natural paper texture
- Subtle document margins
- Realistic ball-point ink
- Natural handwriting scale
- Clean signature line
- Professional spacing
- Slightly realistic lighting/shadow if appropriate

Avoid:

- A blank white canvas with only the signature
- A logo presentation
- A business-card mockup
- A framed artwork
- A computer screen
- A hand holding the paper
- A pen placed beside the document
- Excessive document text
- Fake stamps or seals
- Watermarks
- Random logos
- Unrelated graphics
- Multiple signature lines unless necessary

The **signature must remain the visual centerpiece**.

The document exists only to demonstrate how the signature would look when actually used.

### Important

The text **"Designed by Farid Tofan" must appear exactly as written**.

Do not misspell, alter, translate, abbreviate, or replace the credit.

The final composition should communicate:

**Real document → signature line → custom handwritten signature → "Designed by Farid Tofan" underneath.**

The overall result should look like a **premium professional signature sample created for a client**, not an AI-generated logo sheet.

# OUTPUT BEHAVIOR

After the user gives the name and style, generate the signature image.

Do not provide a long explanation before generating.

The final result should be the **actual artistic signature**, not a description of what the signature could look like.

If the image-generation system supports multiple variations, generate **4 distinctly different signature concepts** based on the same name and selected style.

Each variation should explore a different creative interpretation rather than being minor modifications of the same design.

The ultimate goal is:

**Turn a person's name into a visually intelligent signature where the letters themselves become art.**
Step 2: Choose an AI Tool
There are now many AI-powered tools that can help with creative design, including AI image generators and specialized signature-generation tools.
You can use an AI image generator if you want to create a visual concept. Some tools can understand detailed descriptions such as:
“Create a sophisticated handwritten signature using the name Farid Ullah, with elegant flowing strokes, a distinctive initial F, subtle underline, black ink, white background, realistic pen handwriting.”
The more specific your instructions are, the easier it is for the AI to understand the style you have in mind.
You can also ask AI to generate several different concepts instead of requesting only one.
For example, you could ask for:
- A minimalist business signature
- A bold executive signature
- An artistic calligraphy signature
- An initials-based signature
- A modern handwritten signature
This gives you several directions to explore.
Step 3: Write a Good AI Prompt
The quality of your prompt can have a major impact on the result.
Instead of simply writing:
give the AI more information.
A better prompt would describe the name, style, strokes, composition, and background.
For example:
Notice that this prompt does not just mention the name. It explains what the signature should actually look like.
You can change the instructions according to your personality.
Step 4: Ask AI to Experiment With Different Styles
Don’t settle for the first design.
This is one of the biggest advantages of using AI. You can keep experimenting without having to redraw everything yourself.
Try prompts such as:
For a business style:
“Create a clean, elegant executive signature with confident strokes and minimal decoration.”
For a creative style:
“Create an artistic handwritten signature with expressive loops, flowing strokes, and a distinctive finishing stroke.”
For a minimalist style:
“Create a simple modern signature using initials with clean lines and subtle curves.”
For a bold style:
“Create a bold professional signature with strong initial letters, smooth movement, and a confident underline.”
Generate several variations and compare them.
You may discover that you like the beginning of one signature and the ending of another. That is completely fine. AI is useful for exploring possibilities.
Step 5: Make the Signature Easy to Reproduce
This step is often overlooked.
A signature might look incredible in an AI-generated image but be nearly impossible to reproduce with a real pen.
Remember that your signature is something you may need to write repeatedly.
Imagine signing your name on a bank document, application form, contract, or official paperwork. You don’t want to spend 30 seconds drawing your signature every time.
Look for a design with a few memorable elements.
For example, you could have:
- A distinctive first letter
- A shortened version of your surname
- One or two flowing loops
- A simple underline
- A recognizable finishing stroke
These details can make a signature look unique without making it unnecessarily complicated.
Step 6: Practice the AI-Generated Design
Once you find a design you like, don’t immediately use it as your official signature.
Practice first.
Take a blank sheet of paper and reproduce the main structure several times. Don’t worry about making it perfect during the first attempts.
Start slowly and identify the important movements.
For example:
- Begin with the large initial.
- Connect the middle letters naturally.
- Finish with the final stroke.
- Add the underline if the design has one.
After practicing slowly, try writing it faster.
The goal is not to copy every tiny detail from the AI-generated image. Instead, you want to develop your own natural version of the design.
In fact, your handwritten version may eventually look better than the original AI concept because it becomes uniquely yours.
Step 7: Create a Digital Version
Once you have finalized your signature, you can also create a digital version.
Write your signature using a black pen on clean white paper. Take a high-quality photograph or scan it.
Then you can use an image-editing tool to remove the background and keep only the signature.
A transparent PNG file is particularly useful because you can place the signature over documents, images, PDFs, presentations, or other digital materials.
Keep both versions:
Physical signature: for documents you sign by hand.
Digital signature image: for appropriate digital workflows where inserting an image of your handwritten signature is permitted.
However, remember that a digital image of a handwritten signature is not automatically the same thing as a legally valid electronic or digital signature. For contracts and official online services, follow the platform’s specific signing requirements.
Common Mistakes to Avoid
There are a few mistakes people frequently make when using AI to design signatures.
Making It Too Complicated
More loops do not necessarily mean more professionalism. A signature with too many decorative elements can become difficult to reproduce.
Copying Someone Else’s Signature
AI can generate styles inspired by handwriting and calligraphy, but your signature should represent you. Avoid copying another person’s actual signature.
Using a Computer Font
Some AI-generated signatures look like ordinary cursive fonts. If you want something authentic, specifically ask for natural handwritten strokes and irregularities.
Changing Your Signature Too Often
Once you have chosen and practiced a signature for official use, consistency matters. Constantly changing it can create unnecessary problems when signatures need to be compared.
Final Thoughts
Using AI to create a professional signature is a simple way to explore ideas that might otherwise take hours of experimentation.
The secret isn’t simply asking AI to “make a cool signature.” The better approach is to describe the personality, style, complexity, strokes, and overall appearance you want. Generate multiple concepts, choose the elements you like, simplify the design, and then practice it with a real pen.
Most importantly, don’t try to make your signature look impressive just because an AI generated it. Make it comfortable, recognizable, and yours.
AI can give you the starting point, but the final signature should become something you can confidently write with your own hand.
A great signature doesn’t need to be complicated. Sometimes, a few carefully designed strokes are enough to create something that people remember.